Triumph Spitfire 2.5.

Thursday, January 31, 2008

Roof plug 11.

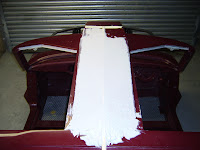
Started filling in passenger side.
The drivers side is pretty much set,
with two small sections to do, to complete this area.
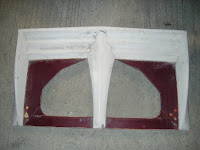
I placed a sheet of plywood, along rear profile,
and carefully marked, and drilled small holes, to
guide ends. Then reversed sheet,
wedged against passenger side guides.
Side vent sections have been added, to drivers side, but will wait to fill in between, so as measuring for passenger side will be easier.

Thursday, January 24, 2008

Roof plug 10.


Painfully slow progress, work commitments take priority at the moment. Have a reasonable line from roof plug to original body work, still needs tidying, bu have the choise of finishing this line now, or fine sanding when mold is done.
Have decided the position of side vents,
which will curl round towards rear.

Sunday, January 13, 2008

Roof plug 9.


Small mistake, revealed in measuring yesterday.
Between either side f the rear section, there was a 3mm difference.
This meant that the petrol cap section , was slightly one sided.
No problem though, cut section out with grinder, re-set today.
Confirmed measurements again today, between front to rear, side to side, levels up and down, and everything is looking as it should be.
The area around the petrol cap is looking good. Slightly raised at either side, blending into surrounding area, makes a nice balance between sheer flat, and curved , sculptured "look".
The side areas are developing, although some thought is needed still, as to "join" to rear downforce wing . Easy to do, but a little more is required to make this area blend in successfully, without making this section look too "awkward".

Saturday, January 12, 2008

Roof plug 8.

Not much time this last few days for plug....still managed to smooth off area shown.
Home decorating is still taking up alot of time...having to do two built in units. Looking forward to getting those out of the way, and getting on with plug!!

Monday, January 07, 2008

Roof plug 7.

As the NACA vents have been removed, side vents are on he cards.
A bit of fun was had in trying to come up with a way of cutting the semi circular "taped" items seen here. First we made a mitre type box, which didn't work out as we hoped. So after a few other ideas were thrown around, we simply clamped the semi circles flat, scored, and cut.
These sections stick out from the car way too much , so it looks as if the way forward is to complete sides, make vents off car, in a box type fashion, cut these into sections, then remove mounting areas in sides of roof, and inlay round towards boot area.

Roof plug 6.

Have blended in the previously "L" shaped rails for removable panels.
Thinking ahead, these could be coloured gelcoat, so no need for painting, or rubber strips , glued, to help seal from the good old English rain!
The rear section is starting to develop.

Saturday, January 05, 2008

Roof plug 5.


My initial hope was to blend the new plug, into the rear down force wing. How ever due to its shape a sufficiently strong join for mould is going to be hard, (but not impossible) to achieve. Also, by having the rear DF wing separate, it can be changed easily.
As can also be seen, the new roof will have no rear windscreen, and no boot lid.
The centre reinforcing section of DF wing is now not really needed, so a grinder made it vanish!:)

I don't know what it is, but i find alot of satisfaction in creating something like a plug, although i am my biggest critic. It always amazes me that the end result is something unique. Okay, so i could be classed as being too creative, can't even look at something like a piece of wood, without wanting to carve,or create something with it. One of the best pieces of advice i have ever had is to keep it simple. Maybe i am not following that with this part of build. But bearing in mind that this is a road car, with occasional track use, the benefits that could be part of the result, i feel it worth the effort.

Roof plug 4.


These wooden strips come in real handy for supporting the filler, and for roughly guiding the sanding to a uniformed finish.
Also, as can be seen, the roof will now blend into side wings Every effort is being made to curve most areas, so as , i think, to keep the shape of the plug, in keeping with the curves of the Spitfire.
Usally i finish a plug by spraying it with primer, this fills the tiny holes that usually are left, and helps to visualise the finished item.

Roof plug 3.


Three guide strips added, filled in between, and sanded.
So now the result is a rough shape to work on.
Petrol cap section added, and lines brought towards the rear boot space area.
The plug area shown in this picture reminds me of a bird...or is just me?:)

Roof plug 2.


Next step was to chop through main centre vent , to "n" section, to raise it up approx 5mm.
This will allow for a larger area to reinforce the "T" section, and allow for more curve across the shoulders.

Roof plug 1.


After measuring, to find out any discrepancies, the first step i took was to give myself a guide line from near the front of main front vent, towards rear. This will enable me to keep a flat line at front , and gradually bring it into a curved line.

Roof .


There were several things i wasn't happy with regarding the roof i made. And if "one" isn't happy with something, there seems to be only a few options. In my case i decided to re-do the roof, as i have the opportunity, and resources available. Things like this can be a fair amount of work, even with "cheats", but if a jobs worth doing, its worth doing right? Of course the idea of the roof in the first place is a debatable subject.
Anyhow,
1/....The back of roof didn't blend into the car enough.
2/....The NACA vents weren't in keeping with the front main vent.
3/....The profile was loosely similar to soft top.
4/....The guide ally strips were too precise for re-movable panels.
5/....The main front vent tunnel is too flat, as is rear "n" where NACA vents are.